Guest blog by Rob at Hughes Trade Peterborough
Founded in 1941, Peerless recently celebrated their 75th anniversary by – of all things – launching the world’s first OUTDOOR soundbar! Needless to say, they have come a long way from their creation when they made antennas for the US government during WW11, moving on and embracing an emerging TV market Peerless designed and developed their first Multi-fit wall mounted TV bracket in 1965. By 1999, they moved firmly into the commercial eye with the launch of the jumbo 2000 commercial ceiling TV mounting system, selling over 1 million units. It’s fair to say between Peerless-AV’s domestic and commercial divisions they can fit a TV pretty much anywhere you can imagine.
My purpose here today is to take a brief look at their most common brackets the flat to wall and tilt 32-50” and 37-75” screen mounts, for my study I’ve taken a look at the TRWS221 as it has all the attributes of its physically larger cousins and allows me to show the tilting arm also common with both sizes.
Out of the box:
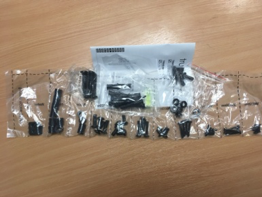
Out of the box there is an impressive amount of supplied fixings and spacers:
- TV: M4 12/30mm, M5 12/30mm, M6 30/MM, M8 15/25/50mm.
- Wall: 4 or 6 6X64MM bolts with sturdy expanding plugs.
There are also a few spacers and a little spirit level, you’d be hard pressed not to find your fittings in that lot.
First Job:
Once you’ve checked your wall type is suitable for the supplied fittings and purchased additional if required, found your baffles and checked for power cables and pipes you’ll need to mark up ready for drilling. So grab your SUPPLIED mini spirit level, sit it on the wall mount and mark away! What a lovely little inclusion that was, so much easier than lugging my big, ungainly builders one from home. Screw your fittings to a good firm fit to prevent any movement but remember not to over-tighten and crack your plasterboard! A handy hint here: if you are mounting to plasterboard you can glue a thin piece of ply to the wall before you begin, this helps to reinforce the wall.
Ready your mounting:
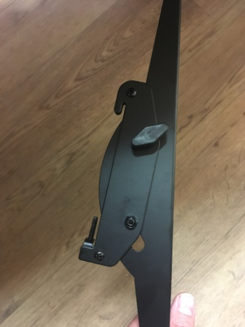
Once you’ve selected the correct screws and spacers, take a moment to look at the arms themselves. You’ll see the locking screw which must be at the bottom of the set. If you’re using the tilt brackets, ensure the large wing not is facing the outside of the TV allowing you to easily adjust the angle through its 10 degree tilt. Again while fitting the arms to the back of the TV take care to ensure they are not loose but do not over tighten. People often worry about how secure the bracket grips the TV but as you can see from the photo, once the securing screw has been tightened there is no room to move and the squared-off ends prevent any chance of sliding off sideways.
Overview:
From the huge bolt pack to the solid bracket, I found the build and finish of this bracket to be excellent, simple things like the mini spirit level and the substantial wing nut all come together to make something easy to fit and easy to use. The smaller brackets (Peerless 211 & Peerless 221) are suitable for Vesa mounting patterns up to 400×400 and a weight tolerance of 32kg allows them to fit many 55” models. For those who need to wall-mount a larger screen, the Peerless TRWS310BK is the ideal bracket for screens up to 75”, with a weight tolerance of up to 48kg.
Find out more online, apply for a trade account, find details about trade rental or ask your local Hughes Trade branch for more information.
The not-so-small-print
• Trade customers need to request a login from their local trade branch to have access to prices online;
• Most products are available to rent or buy (rental subject to location);
• Delivery is free on orders over £300+VAT.